 basa Jawa
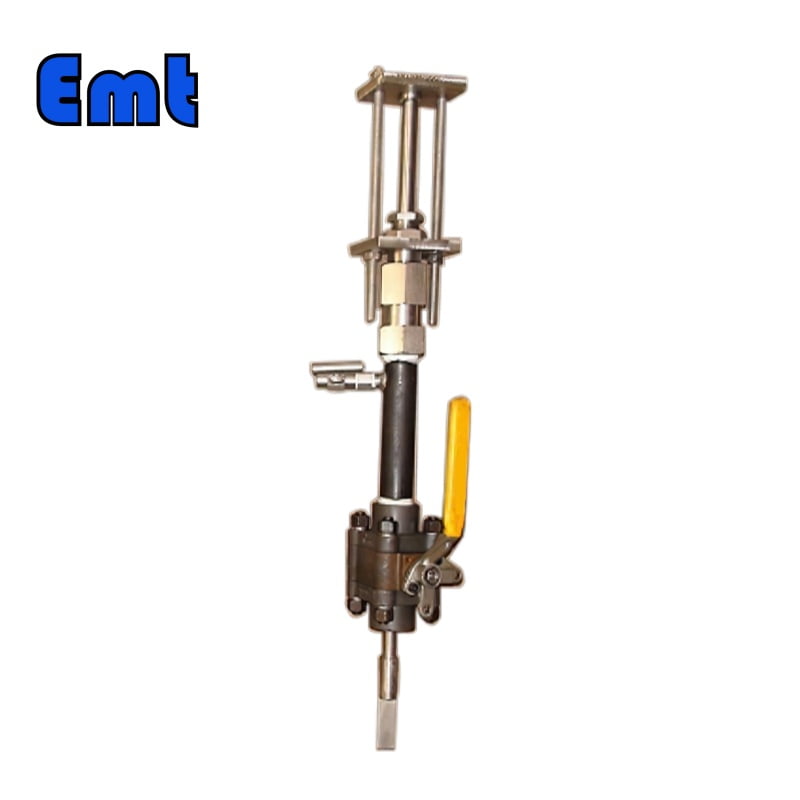
Description
Introduction
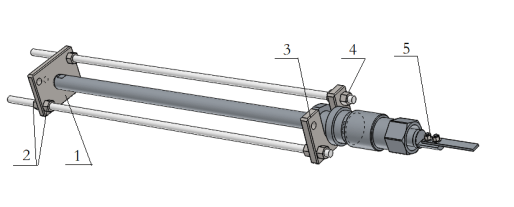
(Figure one)
For pipelines with a design pressure lower than 10 MPa, the adjustable corrosion coupon system is equipped with a dedicated clamp-style installation and removal tool, enabling online dismantling. The EMT-RCC Retractable Corrosion Coupon System is a versatile tool that can handle pressures up to 1500 psi (10.3 MPa) and temperatures as high as 500℉/260℃. This means it can work effectively under tough conditions in pipelines. The depth at which the corrosion coupon probe is installed can be altered based on the pipeline’s diameter and wall thickness. This gives you the flexibility to adjust it to suit different pipeline sizes. Our standard system lengths are 24, 30, 36, 42, and 48 inches. This range of sizes makes it suitable for a variety of pipeline diameters. At the end of the system, there’s a spot for an insulated strip-type corrosion coupon. The system comes complete with everything you need: a probe rod, a ball valve, a corrosion coupon, and an adjustable safety clamp kit. We advise using the safety clamp if the pressure within the pipeline is less than 1500 psi and the temperature is below 500℉. This helps to maintain safety during operation.
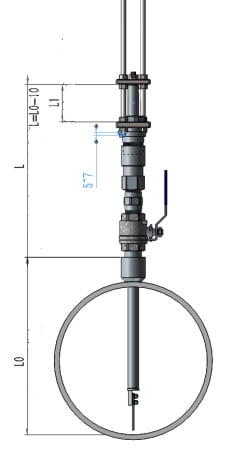
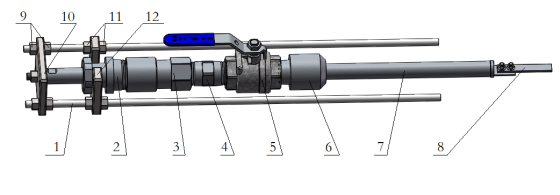
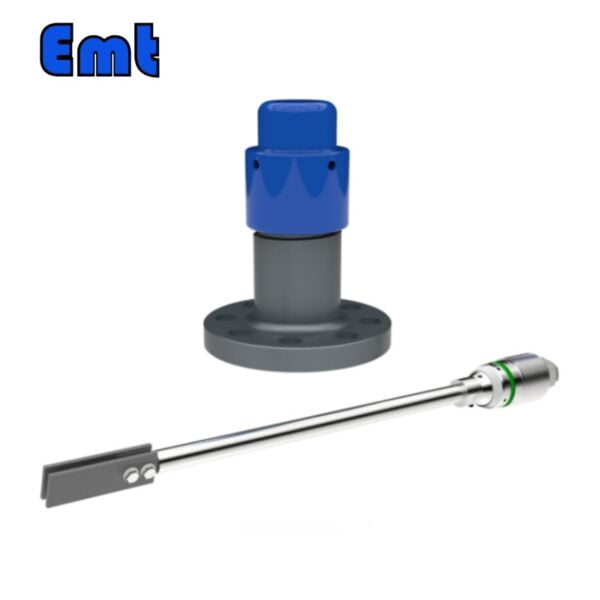
(Figure 2)
Initial Installation of EMT-RCC Adjustable Corrosion Coupons
The product is transported as a whole when leaving the factory, with all components already assembled (including the welded base) and having passed a pressure test. Therefore, during installation, the user must unscrew and separate the welded base from the connection with the valve, weld it to the designated position on the pipe (pre-drilled diameter φ27~30mm), measure the distance L0 as shown in Figure 2, adjust the spacing L1 of the safety clamps (as shown in Figure 2), then install the corrosion coupon system onto the base, adjust the positioning distance L and the direction of the coupon, and tighten the upper and lower safety clamps. The installation is then complete. The specific steps are as follows:
(1) Preparation Before Installation
Make a hole about φ27 to 30 mm wide at the planned spot on the pipe. After you’ve drilled the hole, smooth out any rough edges or bits left behind. Also, make sure to clean off any rust from the area where you’re going to weld.
(2) Separation of the Welded Base
Unscrew the welded base from the corrosion coupon system, separating it at the junction between the welded base and the valve (between items 5 and 6 in Figure 1). Use a wrench to fix the valve body and another wrench to unscrew the welded base.
(3) Welding of the Welded Base (Item 6 in figure 1)
Align the welded base with the drilled hole (perpendicular to the pipe center and wall and concentric with the hole), then weld it to the pipe.
(4) Determine the Installation Distance L
Once you’ve finished welding the base, you’ll need to measure the maximum distance from the top of the welded base to the inside of the pipe. Use a probe rod for this or measure it directly. While measuring, make sure the probe rod stands at a right angle to the pipe’s center and the inside wall. This is the distance labeled as L0 in Figure 2. Next, calculate the positioning distance, L, by subtracting 10 mm from L0. As a result, L = L0 minus 10 mm. Write down this positioning distance and keep it safe. You’ll need this information when you install and maintain the coupon in the future.
(5) Adjust the Safety Clamp Distance
First, tweak the locking nut on the lower safety clamp. Then, referring to the 5-7mm distance shown in Figure 2, secure the two bolts to the lower safety clamp.
Next, adjust the nuts on both sides of the upper safety clamp. This will change the gap between the two safety clamps. You’re aiming for a distance of 90–95 mm, which is shown as L1 in Figure 2.
Once you’ve done these adjustments, your assembly is ready to go.
(6) Install the Sealing Material
Remove any remaining sealing material from the surfaces of the valve threads and the welded base threads. Re-wrap the sealing material on the external threads of the valve.
(7) Install the Corrosion Coupon System
Connect the corrosion coupon system with the welded base (this requires two people). Make sure the threads are aligned and screwed in, rotate the corrosion coupon system until it cannot move, and then tighten the valve with a wrench.
(8) Adjust the corrosion coupon to its final installation position
Based on the distance L calculated in step (4) of this section, adjust the distance between the upper safety clamp and the flat surface of the welded base to the positioning distance L (when the distance between the upper safety clamp and the flat surface of the welded base is greater than L0, the upper safety clamp should be adjusted downwards to equal the L distance). This is the minimum distance, i.e., the maximum depth of the corrosion coupon into the pipe. This ensures that after the coupon system is installed on the base, the lower end of the corrosion coupon is close to the bottom of the pipeline while maintaining a safe distance.
(9) Adjust the Direction of the Corrosion Coupon
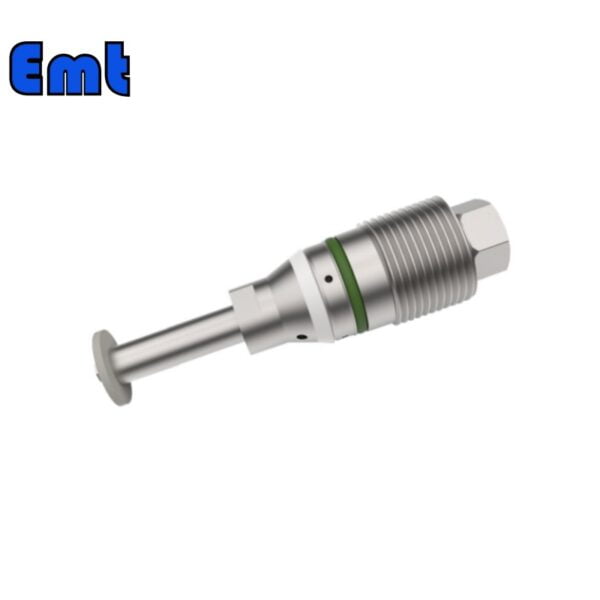
Use a wrench to adjust the direction of the corrosion coupon indicator surface (Figure 3) at the top of the coupon support rod, ensuring that the indicator surface faces the direction of the medium flow inside the pipe. (At this point, the width direction of the corrosion coupon is parallel to the direction of the pipe.)
(10) Tighten the adjustment nuts of the upper safety clamp; check and tighten the locking nuts of the lower safety clamp. The installation is complete.

(Figure 3)
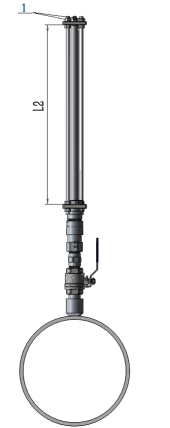
(Figure 4)
Disassembly and Maintenance Inspection of EMT-RCC Adjustable Corrosion Coupon System
When disassembling the coupon system from the pipe for maintenance inspection, follow the steps below.
(1) Set the upper safety clamp to the position where the valve is closed.
Loosen the two nuts on the upper safety clamp, adjust the nuts to the distance L2 as shown in Figure 4, L2 = 515~525mm, then stop.
When there is pressure inside the pipe, the corrosion probe support rod will be pushed upwards as the nuts are loosened. If the coupon support rod does not pop up as the nuts are loosened, check by twisting the coupon support rod to see if it is jammed, to prevent a sudden burst under internal pressure, causing injury.
Note: Two people can operate simultaneously to unscrew the nuts, or one person can unscrew the two nuts alternately (alternate operation every 1 to 2 turns).
Under the pressure inside the pipe, the corrosion coupon support rod should be able to pop out as the nuts are loosened. If it doesn’t pop out, check and handle it promptly to ensure safe operation.
(2) Close the valve.
Rotate the valve handle to the closed state.
Note: Before closing the valve, you must confirm the distance L2, L2=515~525mm, to prevent the valve from being affected by a small L2 distance or causing damage to internal parts.
(3) Disassemble the sealing nut of the coupon system.
Fix the branch pipe (No. 4 in Figure 1) on the top of the valve with a wrench. Use another wrench to turn the sealing nut counterclockwise. After it is loosened, use your hand to turn it, separate the sealing nut and the parts above it as a whole, and place them safely.
(Note: This operation requires two people.)
With this operation, the coupon system can be removed from the welded base and the pipe, and the disassembly work is completed.
(4) Disassembly of the Corrosion Coupon
When it is necessary to disassemble the corrosion coupon, you should adjust the nuts on the upper safety clamp of the corrosion coupon device, reducing the distance between the two safety clamps, until the corrosion coupon and the nuts fixing the corrosion coupon fully extend out of the sealing nut. The extension length should be sufficient to facilitate the disassembly of the nuts fixing the corrosion coupon. Refer to the state in Figure 5.
Unscrew the nuts that are fixing the corrosion coupon, remove the corrosion coupon, and carry out subsequent inspections or replacements.
- Upper Safety Clamp
- Adjustment Nut
- Lower Safety Clamp
- Locking Nut (locked during adjustment)
- Corrosion coupon fixing nut
(Figure 5)
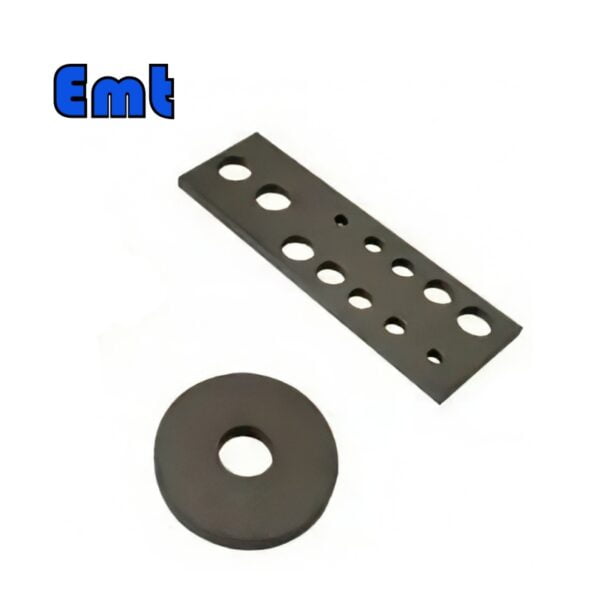
Parameters
| Shape | strip |
| Dimensions | 3″ x 1/2″ x 1/16″ (7.6 cm x 1.3 cm x 0.16 cm) |
| Installation hole | 2 holes |
| surface area | 3.4 in² (21.9 cm²) |
Furthermore, the specifications of the corrosion coupons can be tailored to meet the use of the user. Besides the strip shape, we also provide the circular type and other special types.
Components of EMT Adjustable Corrosion Coupons
- Safety Clamp Assembly
- Lock Nut
- Sealing Nut
- Connection Pipe
- Full Bore Ball Valve
- Welded Base
- Coupon Mounting Rod
- Corrosion Coupon
- Adjustment Nut
- Upper Safety Clamp
- Locking Nut
Reinstallation of EMT-RCC Adjustable Corrosion Coupons
After the corrosion coupon replacement is completed or reinstalled after the inspection work, proceed with the reinstallation of the coupon device.
(1)Confirm whether the adjustment rod is adjusted in place.
Measure and adjust the distance between the two safety clamps (important), it should meet L2=515~525mm in Figure 4. If it does not meet this criterion, adjustments should be made to this range. (Note: Keep the lower safety clamp stationary during the adjustment process, only adjust the upper safety clamp during the adjustment process.)
(2)Replace the sealing material.
Clear the residual sealing material at the branch pipe threads and the sealing nut, and wrap new sealing material at the branch pipe threads.
(3)Install the coupon device.
Align the coupon device with the branch pipe threads, hand-tighten until it doesn’t move, then use a wrench to tighten the sealing nut.
(4)Open the Valve.
After opening the valve, check whether there is any leakage at the branch pipe connection and other threaded connections. If there is leakage, close the valve, then deal with the leaking seal (replace the sealing material or replace parts, maintain and reinstall). If there is still leakage, repeat this step until there is no leakage.
(5)Adjust the upper safety clamp to its initial installation position.
Adjust the lower adjustment nut of the upper safety clamp to the lowest position, and promptly adjust this nut when it affects the adjustment of the upper adjustment nut.
Adjust the distance between the upper safety clamp and the surface of the welded base to the initial installation record distance L, see step (4) of the initial installation.
When adjusting the nuts, a single person can operate alternately to tighten the two nuts; or two people can simultaneously tighten the two nuts, trying to keep the upper safety clamp perpendicular to the coupon support rod to avoid excessive tilt.
(6)Lock the Coupon Support Rod.
After the upper safety clamp is adjusted in place, check the direction of the coupon support rod, turn the coupon support rod so that the indicator surface (Figure 3) points in the direction of the pipeline medium flow.
Tighten the upper and lower adjustment nuts of the upper safety clamp, check and tighten the lock nut of the lower safety clamp. Installation is complete.
With this, the reinstallation process ends.
-600x600.jpg)
Lvivforum.Pp.Ua –
This is the riht webpage for anybody who hoprs to fnd out about this topic.
You understand a whole lot its almost tough to argue with you (not that I
really will need to…HaHa). You definitely put a neew spin on a topic that has
been discussed for ages. Wonderful stuff, just
great! https://Lvivforum.Pp.ua/