Описание
Введение
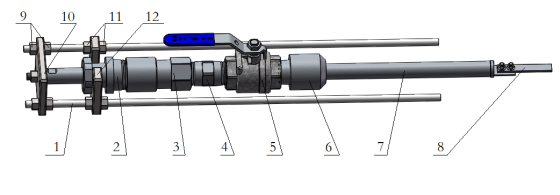
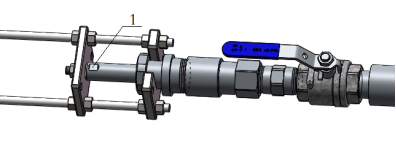
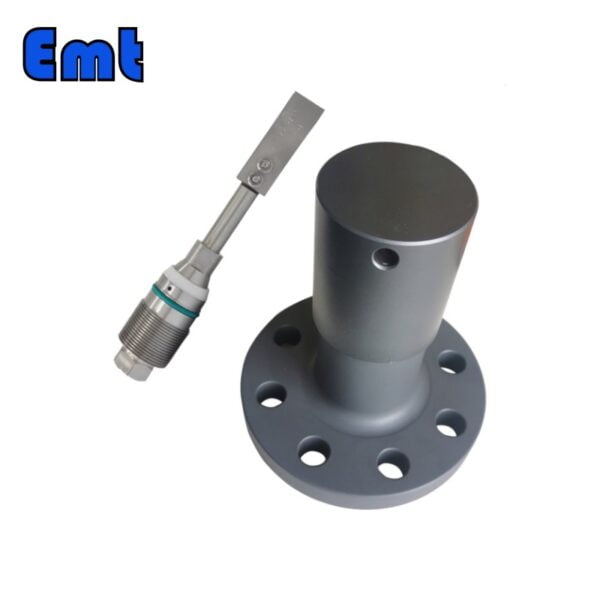
(Рисунок один)
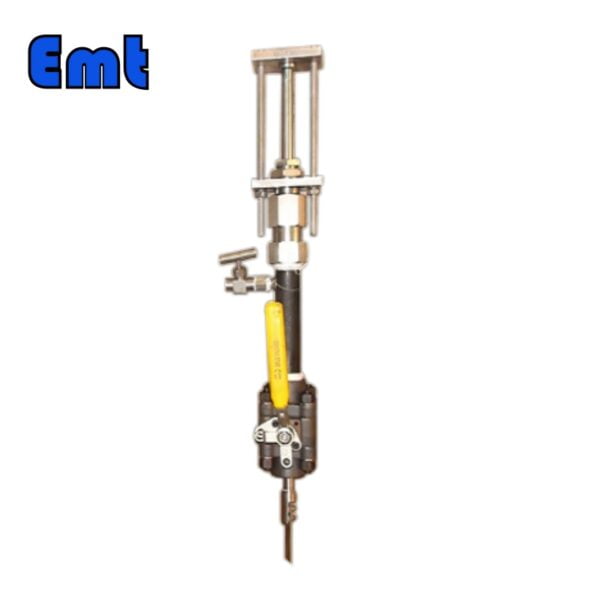
Для трубопроводов с расчетным давлением ниже 10 МПа регулируемая система защиты от коррозии оснащена специальным инструментом для установки и снятия в виде хомута, позволяющим осуществлять демонтаж в режиме реального времени. Выдвижная система защиты от коррозии EMT-RCC — это универсальный инструмент, способный выдерживать давление до 1500 фунтов на квадратный дюйм (10,3 МПа) и температуру до 500 ℉/260 ℃. Это означает, что он может эффективно работать в сложных условиях трубопроводов. Глубина установки купонного зонда может быть изменена в зависимости от диаметра трубопровода и толщины стенки. Это дает вам возможность адаптировать его к трубопроводам разных размеров. Стандартная длина нашей системы составляет 24, 30, 36, 42 и 48 дюймов. Благодаря такому диапазону размеров он подходит для трубопроводов различных диаметров. В конце системы имеется место для изолированного антикоррозийного купона ленточного типа. В комплект поставки системы входит все необходимое: стержень зонда, шаровой клапан, купон на коррозию и комплект регулируемых предохранительных зажимов. Мы советуем использовать предохранительный зажим, если давление внутри трубопровода менее 1500 фунтов на квадратный дюйм и температура ниже 500 ℉. Это помогает сохранить безопасность во время работы.
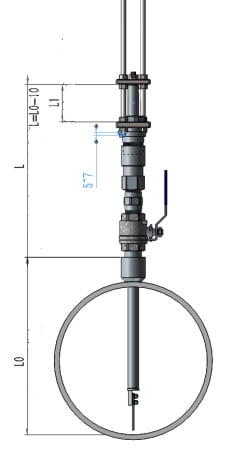
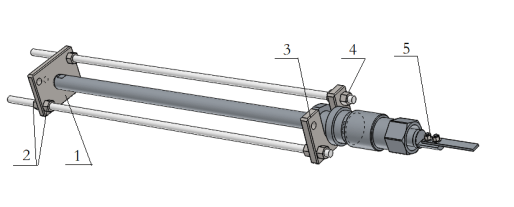
(рис. 2)
Первоначальная установка регулируемых антикоррозийных купонов EMT-RCC
The product is transported as a whole when leaving the factory, with all components already assembled (including the welded base) and having passed a pressure test. Therefore, during installation, the user must unscrew and separate the welded base from the connection with the valve, weld it to the designated position on the pipe (pre-drilled diameter φ27~30mm), measure the distance L0 as shown in Figure 2, adjust the spacing L1 of the safety clamps (as shown in Figure 2), then install the corrosion coupon system onto the base, adjust the positioning distance L and the direction of the coupon, and tighten the upper and lower safety clamps. The installation is then complete. The specific steps are as follows:
(1) Подготовка перед установкой
Сделайте отверстие шириной от 27 до 30 мм в намеченном месте на трубе. После того, как вы просверлили отверстие, сгладьте все неровные края и оставшиеся кусочки. Также обязательно очистите место сварки от ржавчины.
(2) Отделение сварного основания
Отвинтить сварное основание от антикоррозийной системы, отделив его в месте соединения сварного основания с клапаном (между поз. 5 и 6 на рисунке 1). Используйте гаечный ключ, чтобы зафиксировать корпус клапана, и другой ключ, чтобы отвинтить сварное основание.
(3) Сварка сварного основания (поз. 6 на рис. 1)
Совместите сварное основание с просверленным отверстием (перпендикулярно центру трубы и стенке и концентрично отверстию), затем приварите его к трубе.
(4) Определите расстояние установки L.
После того, как вы закончите сварку основания, вам нужно будет измерить максимальное расстояние от верхней части сварного основания до внутренней части трубы. Используйте для этого щуп или измерьте его напрямую. Во время измерения убедитесь, что стержень зонда стоит под прямым углом к центру трубы и внутренней стенке. Это расстояние обозначено как L0 на рисунке 2. Затем рассчитайте расстояние позиционирования L, вычитая 10 мм из L0. В результате L = L0 минус 10 мм. Запишите это расстояние позиционирования и сохраните его. Эта информация понадобится вам при установке и обслуживании купона в будущем.
(5) Отрегулируйте расстояние безопасного зажима.
Сначала отрегулируйте контргайку нижнего предохранительного зажима. Затем, следуя расстоянию 5–7 мм, показанному на рисунке 2, закрепите два болта на нижнем предохранительном зажиме.
Затем отрегулируйте гайки с обеих сторон верхнего предохранительного зажима. Это изменит зазор между двумя предохранительными зажимами. Вам необходимо расстояние 90–95 мм, которое показано как L1 на рисунке 2.
После того, как вы внесете эти изменения, ваша сборка готова к работе.
(6) Установите уплотнительный материал.
Удалите остатки уплотнительного материала с поверхностей резьбы клапана и резьбы приваренного основания. Повторно намотайте уплотнительный материал на внешнюю резьбу клапана.
(7) Установите систему защиты от коррозии.
Соедините систему защиты от коррозии со сварным основанием (для этого требуется два человека). Убедитесь, что резьбы выровнены и закручены, поверните систему защиты от коррозии до тех пор, пока она не перестанет двигаться, а затем затяните клапан гаечным ключом.
(8) Установите антикоррозийный купон в окончательное положение установки.
На основе расстояния L, рассчитанного на шаге (4) данного раздела, отрегулируйте расстояние между верхним предохранительным зажимом и плоской поверхностью сварного основания до установочного расстояния L (когда расстояние между верхним предохранительным зажимом и плоской поверхностью сварного основания сварное основание превышает L0, верхний предохранительный зажим следует отрегулировать вниз, чтобы оно было равно расстоянию L). Это минимальное расстояние, т. е. максимальная глубина проникновения коррозионного купона в трубу. Это гарантирует, что после установки купонной системы на основание нижний конец антикоррозионного купона будет находиться близко к нижней части трубопровода, сохраняя при этом безопасное расстояние.
(9) Отрегулируйте направление коррозионного купона.
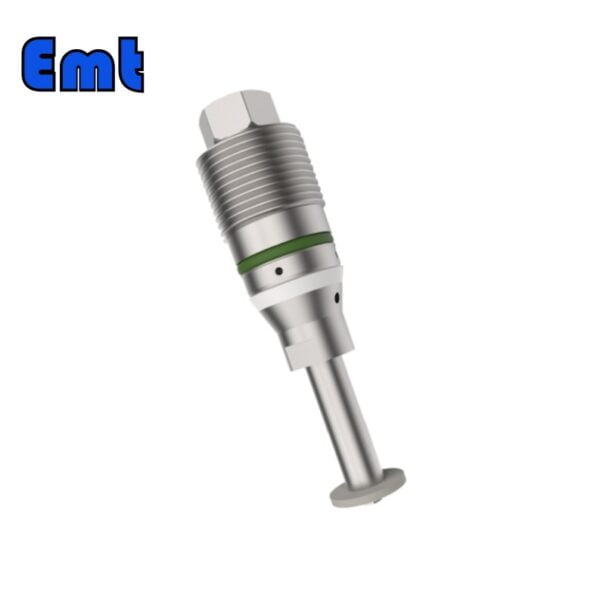
С помощью гаечного ключа отрегулируйте направление поверхности индикатора коррозии купона (рис. 3) в верхней части опорного стержня купона, убедившись, что поверхность индикатора обращена к направлению потока среды внутри трубы. (В этот момент направление ширины образца коррозии параллельно направлению трубы.)
(10) Затяните регулировочные гайки верхнего предохранительного зажима; проверьте и затяните контргайки нижнего предохранительного зажима. Установка завершена.
(рис. 3)
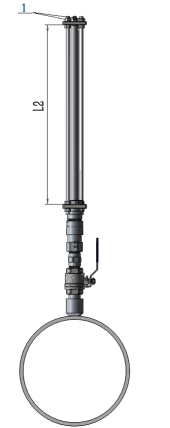
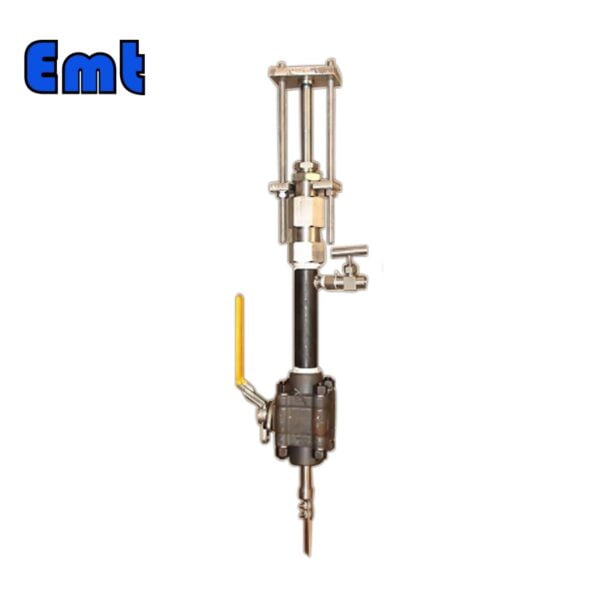
(рис. 4)
Разборка и техническое обслуживание регулируемой системы защиты от коррозии EMT-RCC
При разборке купонной системы с трубы для технического осмотра выполните следующие действия.
(1) Установите верхний предохранительный зажим в положение, при котором клапан закрыт.
Loosen the two nuts on the upper safety clamp, adjust the nuts to the distance L2 as shown in Figure 4, L2 = 515~525mm, then stop.
When there is pressure inside the pipe, the corrosion probe support rod will be pushed upwards as the nuts are loosened. If the coupon support rod does not pop up as the nuts are loosened, check by twisting the coupon support rod to see if it is jammed, to prevent a sudden burst under internal pressure, causing injury.
Note: Two people can operate simultaneously to unscrew the nuts, or one person can unscrew the two nuts alternately (alternate operation every 1 to 2 turns).
Under the pressure inside the pipe, the corrosion coupon support rod should be able to pop out as the nuts are loosened. If it doesn’t pop out, check and handle it promptly to ensure safe operation.
(2) Close the valve.
Rotate the valve handle to the closed state.
Note: Before closing the valve, you must confirm the distance L2, L2=515~525mm, to prevent the valve from being affected by a small L2 distance or causing damage to internal parts.
(3) Disassemble the sealing nut of the coupon system.
Закрепите патрубок (№ 4 на рисунке 1) на верхней части клапана с помощью гаечного ключа. Другим ключом поверните уплотнительную гайку против часовой стрелки. После того, как он ослаблен, поверните его рукой, отделите уплотнительную гайку и детали над ней в целом и надежно разместите их.
(Примечание: для этой операции требуется два человека.)
Благодаря этой операции купонную систему можно снять со сварного основания и трубы, и работы по демонтажу завершаются.
(4) Разборка антикоррозийного купона
При необходимости разобрать купон на коррозию следует отрегулировать гайки на верхнем предохранительном зажиме устройства купона на коррозию, уменьшая расстояние между двумя предохранительными зажимами до тех пор, пока купон на коррозию и гайки, фиксирующие купон на коррозию, полностью не выдвинутся из уплотнительная гайка. Длина удлинителя должна быть достаточной для облегчения демонтажа гаек, фиксирующих антикоррозийный купон. См. состояние на рисунке 5.
Отвинтите гайки, фиксирующие образец защиты от коррозии, снимите образец защиты от коррозии и выполните последующие проверки или замену.
- Верхний предохранительный зажим
- Регулировочная гайка
- Нижний предохранительный зажим
- Контргайка (фиксируется во время регулировки)
- Гайка крепления купона от коррозии
(Рисунок 5)
Параметры
| Форма | полоска |
| Размеры | 3 дюйма x 1/2 дюйма x 1/16 дюйма (7,6 см x 1,3 см x 0,16 см) |
| Монтажное отверстие | 2 holes |
| surface area | 3.4 in² (21.9 cm²) |
Furthermore, the specifications of the corrosion coupons can be tailored to meet the use of the user. Besides the strip shape, we also provide the circular type and other special types.
Components of EMT Adjustable Corrosion Coupons
- Safety Clamp Assembly
- Lock Nut
- Sealing Nut
- Соединительная труба
- Полнопроходной шаровой кран
- Сварное основание
- Купон Монтажный стержень
- Коррозионный купон
- Регулировочная гайка
- Верхний предохранительный зажим
- Стопорная гайка
Reinstallation of EMT-RCC Adjustable Corrosion Coupons
После завершения замены купона коррозии или его повторной установки после контрольных работ приступайте к повторной установке устройства купона.
(1)Confirm whether the adjustment rod is adjusted in place.
Measure and adjust the distance between the two safety clamps (important), it should meet L2=515~525mm in Figure 4. If it does not meet this criterion, adjustments should be made to this range. (Note: Keep the lower safety clamp stationary during the adjustment process, only adjust the upper safety clamp during the adjustment process.)
(2) Замените уплотнительный материал.
Удалите остатки уплотнительного материала с резьбы патрубка и уплотнительной гайки и нанесите новый уплотнительный материал на резьбу патрубка.
(3) Установите купонное устройство.
Совместите купонное устройство с резьбой патрубка, затяните вручную до полной остановки, затем с помощью гаечного ключа затяните уплотнительную гайку.
(4) Откройте клапан.
После открытия клапана проверьте, нет ли утечек в патрубке и других резьбовых соединениях. Если есть утечка, закройте клапан, затем устраните протекающее уплотнение (замените уплотнительный материал или замените детали, обработайте и переустановите). Если утечка все еще есть, повторяйте этот шаг до тех пор, пока утечка не исчезнет.
(5) Отрегулируйте верхний предохранительный зажим в исходное положение установки.
Установите нижнюю регулировочную гайку верхнего предохранительного зажима в самое нижнее положение и незамедлительно отрегулируйте эту гайку, если она влияет на регулировку верхней регулировочной гайки.
Отрегулируйте расстояние между верхним предохранительным зажимом и поверхностью сварного основания до значения L, записанного при первоначальной установке, см. шаг (4) первоначальной установки.
При регулировке гаек один человек может поочередно затягивать две гайки; или два человека могут одновременно затягивать две гайки, стараясь удерживать верхний предохранительный зажим перпендикулярно опорному стержню купона, чтобы избежать чрезмерного наклона.
(6) Зафиксируйте опорный стержень купона.
После установки верхнего предохранительного зажима проверьте направление опорного стержня купона, поверните опорный стержень купона так, чтобы индикаторная поверхность (рисунок 3) была направлена в сторону потока среды в трубопроводе.
Затяните верхнюю и нижнюю регулировочные гайки верхнего предохранительного зажима, проверьте и затяните контргайку нижнего предохранительного зажима. Установка завершена.
На этом процесс переустановки заканчивается.

Львовфорум.Пп.Ua –
This is the riht webpage for anybody who hoprs to fnd out about this topic.
You understand a whole lot its almost tough to argue with you (not that I
really will need to…HaHa). You definitely put a neew spin on a topic that has
been discussed for ages. Wonderful stuff, just
great! https://Lvivforum.Pp.ua/